|
by Gerald Warner, Softball Pitching
Instructor


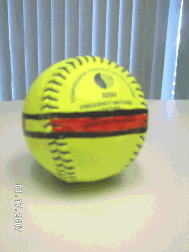
A striped
softball is an excellent tool to assist a pitcher with making
certain that she has the (a) the correct rotation and
(b) the
maximum spin speed on her breaking
pitches.
If you are highly intelligent, have very good athleticism,
and
are skilled in freehand art, then you too can create a
striped softball.
Otherwise, you can get a 12-year old to do it for you.
Seriously though, this is one of the best tools for a
pitcher who is constantly trying to improve her drop, curve,
screw, and rise balls.
Every breaking pitch needs to spin in the correct
direction, and needs to be rotating at a fast speed.
A ball with a stripe drawn across
the center of its four seams is the best visual indicator of spin
direction and spin
speed.
TO
CREATE A
(standard
“4-seamer”) STRIPED
BALL:
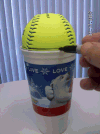
(1) Find a cup or glass that is
just the right size to allow a softball to sit in the opening, with
just a little more than half of the ball sticking above the
rim.
(Finding
the right size cup is kind of fun, because it might involve buying a
few different sizes of Slurpees, soft drinks, etc. from your local
convenience store or sandwich shop).

(2) Place the ball softly
(don’t
push it hard into the cup) into the top
with the “narrows” of the seams at the absolute top. Take some time to make
certain the ball is correctly set with the middle of the
close-together seams straight
up.
(3) Using the top of the cup as
your guide, use a felt-tip permanent marker to draw the first
line around the ball… passing through the middle of the 4 wide-apart
seams.
(4) After completing the first
line, turn the ball over with the other set of 
“narrows” at
the top, and draw the second line the same
way.
(5) Leaving some planned open
areas, fill in the space between the two lines with another color
permanent marker (like
the red one in this example). We recommend that you
do not fill in the middle areas totally so it will be easier to see
the speed of the rotation when the ball is thrown.
(See the example at the top
of this page).
For
pitchers who use a “4-seam” release on each of their breaking
pitches, the stripe will make it easy to see the straight or angled
direction of the rotation, AND the partially-filled in color will
give an indication of the speed of the spin.
This article above can be downloaded and printed from
Microsoft Word

Do you want to reprint this article
or use it on your website or in your
newsletter?
As long as it is not for profit,
our only requirement is that you first notify us, then include the
following sentence:
Article by Gerald Warner of
PitchSoftball.com
and include a reference to this
website: www.pitchsoftball.com
If
you have questions or need more information
E-mail us, or call Pitching Instructor Gerald Warner in
Colorado at (720) 200-4575
| 


